How to Add Three.js to Your Next.js App
Have you ever wondered how those sleek 3D car models and interactive graphics show up on modern websites? Behind many of these stunning experiences is Three.js, a powerful JavaScript library that brings 3D to the web. If you’re curious about how to add 3D scenes seamlessly into your React and Next.js projects, you’re in the right place. This post dives into building a fun and interactive Three.js playground using React Three Fiber and Next.js. Showing you practical steps and cool tools to make your own 3D web experiences come alive.

Jordan Wu
13 min read·Posted
Table of Contents
Three.js
Three.js is a JavaScript library that makes it easy to display 3D graphics in the web browser. It provides a high-level API for rendering scenes using lights, cameras, materials, and more. Developers use it to build interactive 3D experiences, games, data visualizations, and simulations that run smoothly across modern browsers. Three.js has been used to create many inspiring websites developed by top creative agencies around the world, a good website I use to get inspired is Godly.
This blog post won’t cover how to learn Three.js from scratch. If you’re new to it, I recommend starting with the official Three.js documentation for a solid foundation. For a more structured, beginner-friendly approach, check out Three.js Journey. These resources explain the core concepts like scenes, cameras, meshes, materials, textures, loaders, lights, shadows, and more. Once you’re comfortable with the basics, you’ll be ready to start adding 3D content to your own website.
React Three Fiber
React Three Fiber is a powerful React renderer for Three.js that allows you to build 3D scenes using React components. Instead of writing imperative Three.js code. You can describe your 3D scene declaratively using JSX. This make it easier to structure and manage complex scenes with familiar React patterns like hooks, state, and context. It integrates seamlessly with the React ecosystem and supports all of Three.js’s features, including lights, cameras, physics, and post-processing. With React Three Fiber, building interactive 3D experiences in the browser becomes more intuitive and maintainable.
We will be using @react-three/drei, a helper library for React Three Fiber that provides a collection of ready-to-use, high-level abstractions and components to speed up 3D development. It includes useful helpers like cameras, controls, loaders, shaders, and geometry primitives. Things that would otherwise require repetitive or boilerplate code in raw Three.js. By simplifying common tasks like loading models, setting up orbit controls, or adding environment maps. Drei helps you focus more on building your scene rather than reinventing foundational pieces. It’s widely used alongside React Three Fiber to streamline 3D workflows in React projects.
After grasping the basics and exploring the tools that help create interactive experiences with Three.js, the best way to learn is by studying examples and diving into their source code. When you find a project that inspires you, try recreating it in your own project. Learning happens through doing, and most ideas have already been explored. The true innovators are those who master their craft and develop the mindset needed to push boundaries and create something new.
Creating an Interactive Three.js Playground in Next.js
In this section, we’ll explore how to add a Three.js Playground page in Next.js. This example is based on a React Three Fiber scene featuring a Lamborghini Urus. I found this example really cool and wanted to include it in my project. So that’s exactly what we’re going to do. You can find the example project here.
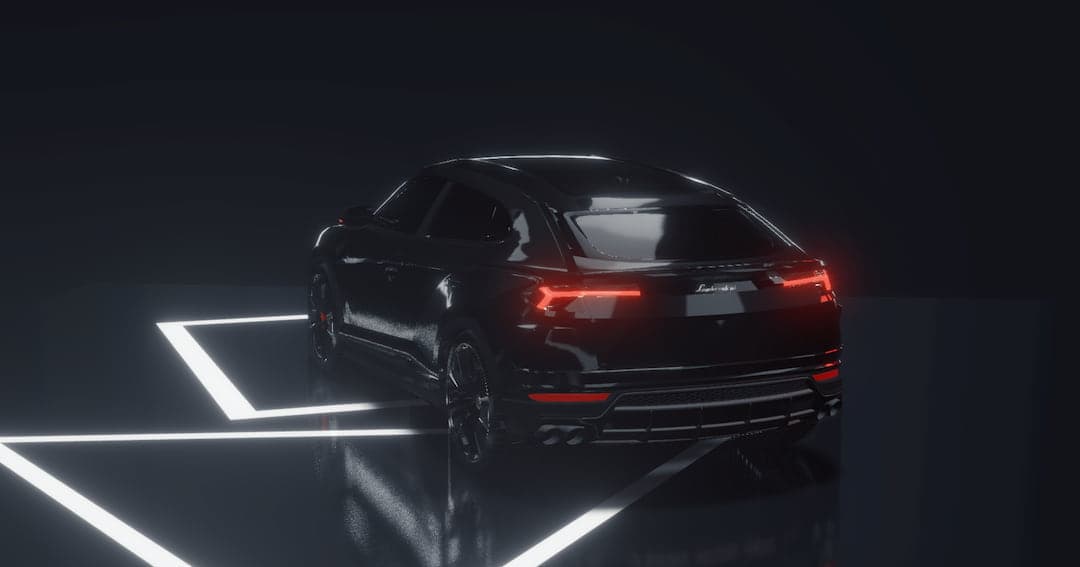
As much as I’d love to own a Lamborghini Urus, I decided to use a different car for this example. That’s the fun part. When working on a personal project like this, you have the freedom to customize it however you want. The car I wanted to use is Porsche 911 GT3. What I like about Porsche is it has a strong identity of heritage, precision engineering, performance, and luxury. Some of the qualities I aspire to reflect in my own personal brand.
You can find plenty of 3D models to download online. After doing some searching, I came across a high-quality 3D model of the car—and the best part is, it’s completely free! Check it out here..
I downloaded the glTF version of the assets which included the following files:
|-- textures
|   |-- ... textures files
|-- scene.gltf
|-- scene.bin
|-- license.txt
Getting Started
We start by downloading all the dependencies for our project.
pnpm add three @react-three/fiber @react-three/drei postprocessing @react-three/postprocessing leva
Now install the TypeScript type definition package for the Three.js library as a dev dependency.
pnpm add -D @types/three
App Router Project Structure
If you already have a Next.js app set up using the App Router, you can refer to the Project Structure and Organization section for a quick refresher. To add a new page for our example it could have the following structure:
|-- src
|   |-- app
|   |   |-- playground
|   |   |   |-- three-js-porsche
|   |   |   |   |-- CameraRotator.tsx
|   |   |   |   |-- Effects.tsx
|   |   |   |   |-- Porsche.tsx
|   |   |   |   |-- page.tsx
Next you would need to include the Porsche assets into our public folder.
|-- public
|   |-- three-js
|   |   |-- F-6800-STD.cube
|   |   |-- porsche-911-gt3
|   |   |   |-- three-js-porsche
|   |   |   |   |-- textures
|   |   |   |   |   |-- ... textures files
|   |   |   |   |-- scene.gltf
|   |   |   |   |-- scene.bin
|   |   |   |   |-- license.txt
Optional: I’ve included the F-6800-STD.cube file from the React Three Fiber Lamborghini example, which I’ll be using in this project.
Building the 3D Scene
Time for the fun part. Creating our 3D scene in our playground page.
'use client'

import { Suspense, useState } from 'react'
import { Canvas } from '@react-three/fiber'
import { Environment, Lightformer, OrbitControls, ContactShadows, Stats } from '@react-three/drei'
import { Leva } from 'leva'
import isMobile from 'ismobilejs'
import { Effects } from './Effects'
import Porsche from './Porsche'
import CameraRotator from './CameraRotator'

export default function ThreejsPorschePage() {
  const [isUserInteracting, setIsUserInteracting] = useState(false)
  const isMobileDevice = isMobile(window.navigator).any

  return (
    <>
      <Leva
        titleBar={{
          drag: true,
          position: isMobileDevice ? { x: -64, y: 4 } : { x: 0, y: 58 },
        }}
        collapsed
      />
      <Stats showPanel={0} className="stats" />
      <Suspense fallback={null}>
        <Canvas
          gl={{ logarithmicDepthBuffer: true, antialias: false }}
          dpr={[1, 1.5]}
          camera={{ position: [0, 0, isMobileDevice ? 45 : 15], fov: 25 }}
        >
          <color attach="background" args={['#171717']} />
          <hemisphereLight intensity={0.5} />
          <Porsche rotation={[0, Math.PI * 1.12, 0]} scale={2} />
          <ContactShadows
            resolution={1024}
            frames={1}
            position={[0, -1.16, 0]}
            scale={15}
            blur={0.5}
            opacity={1}
            far={20}
          />
          <mesh scale={4} position={[3, -1.161, -1.5]} rotation={[-Math.PI / 2, 0, Math.PI / 2.5]}>
            <ringGeometry args={[0.9, 1, 4, 1]} />
            <meshStandardMaterial color="white" roughness={0.75} />
          </mesh>
          <mesh scale={4} position={[-3, -1.161, -1]} rotation={[-Math.PI / 2, 0, Math.PI / 2.5]}>
            <ringGeometry args={[0.9, 1, 3, 1]} />
            <meshStandardMaterial color="white" roughness={0.75} />
          </mesh>
          <Environment resolution={512}>
            <Lightformer intensity={2} rotation-x={Math.PI / 2} position={[0, 4, -9]} scale={[10, 1, 1]} />
            <Lightformer intensity={2} rotation-x={Math.PI / 2} position={[0, 4, -6]} scale={[10, 1, 1]} />
            <Lightformer intensity={2} rotation-x={Math.PI / 2} position={[0, 4, -3]} scale={[10, 1, 1]} />
            <Lightformer intensity={2} rotation-x={Math.PI / 2} position={[0, 4, 0]} scale={[10, 1, 1]} />
            <Lightformer intensity={2} rotation-x={Math.PI / 2} position={[0, 4, 3]} scale={[10, 1, 1]} />
            <Lightformer intensity={2} rotation-x={Math.PI / 2} position={[0, 4, 6]} scale={[10, 1, 1]} />
            <Lightformer intensity={2} rotation-x={Math.PI / 2} position={[0, 4, 9]} scale={[10, 1, 1]} />
            <Lightformer intensity={2} rotation-y={Math.PI / 2} position={[-50, 2, 0]} scale={[100, 2, 1]} />
            <Lightformer intensity={2} rotation-y={-Math.PI / 2} position={[50, 2, 0]} scale={[100, 2, 1]} />
            <Lightformer
              form="ring"
              intensity={10}
              scale={2}
              position={[10, 5, 10]}
              onUpdate={(self) => self.lookAt(0, 0, 0)}
            />
          </Environment>
          <Effects />
          <OrbitControls
            enablePan={false}
            enableZoom={isMobileDevice}
            minPolarAngle={Math.PI / 2.2}
            maxPolarAngle={Math.PI / 2.2}
            onStart={() => setIsUserInteracting(true)}
            onEnd={() => setIsUserInteracting(false)}
          />
          <CameraRotator isUserInteracting={isUserInteracting} />
        </Canvas>
      </Suspense>
    </>
  )
}
Leva is a lightweight GUI (graphical user interface) library for React that makes it easy to create live-editable controls for your application's variables. It's especially popular in creative coding and 3D development, allowing you to tweak values such as colors, positions, and settings in real time. Leva is fully declarative, easy to integrate, and provides a clean, responsive UI out of the box—making it great for prototyping, fine-tuning, and visual debugging.
Stats provides a simple performance monitor for web applications. It displays real-time metrics like frames per second (FPS), CPU usage, and memory consumption. Helping developers spot bottlenecks and optimize rendering performance, especially in graphics-heavy apps like those using Three.js. The compact overlay can be easily added to your webpage, making it a handy tool during development and debugging.
In React Three Fiber, the Canvas component is the entry point that sets up and renders a Three.js scene inside a React application. It acts like a wrapper around a <canvas> HTML element and provides the rendering context, camera, lighting, and the Three.js render loop. You place all your 3D components inside <Canvas>, and it takes care of managing updates, resizing, and the animation frame loop. This allows you to build complex 3D scenes using React declaratively.
ContactShadows adds realistic soft shadows beneath 3D objects, simulating the subtle shadows they cast when touching a surface. It enhances the sense of depth and grounding in a scene without the performance cost of full dynamic shadows. Built on a custom shader and render pass, it's easy to use and customizable. Letting you adjust blur, opacity, color, and resolution to match your scene's lighting style.
Environment is a component that sets up a realistic lighting and reflection environment in your 3D scene using an HDR image or a preset. It simulates natural ambient lighting by wrapping your scene in a skybox or light probe, which enhances realism. Especially on reflective or glossy surfaces. You can use presets like "sunset" or load custom HDR files to control the mood and tone of your scene with minimal setup.
Lightformer is a utility component that lets you add custom, stylized light sources to an environment map. It works within an <Environment> and creates invisible light shapes (like panels, rings, or spheres) that emit light. Allowing you to artistically control reflections and highlights in your scene. It's great for achieving cinematic lighting effects, such as soft boxes or rim lights, without needing complex light setups.
OrbitControls is a utility that allows users to interactively control the camera using their mouse or touch input. It enables features like orbiting around a target, zooming in and out, and panning. Making it ideal for exploring 3D scenes. OrbitControls greatly improves user experience by giving intuitive control over the scene's perspective without needing to write custom input logic.
'use client'

import * as THREE from 'three'
import { useMemo, Suspense } from 'react'
import { applyProps } from '@react-three/fiber'
import { useGLTF } from '@react-three/drei'

type SceneModelProps = {
  position?: [number, number, number]
  scale?: number | [number, number, number]
  rotation?: [number, number, number]
}

function Model(props: SceneModelProps) {
  const { scene, nodes, materials } = useGLTF('/three-js/porsche-911-gt3/scene.gltf')

  useMemo(() => {
    Object.values(nodes).forEach((node) => {
      if (node instanceof THREE.Mesh) {
        if (node.name.toLowerCase() === 'object_30') {
          node.material.color.set('#ff0000')
          node.material.emissive = new THREE.Color('#ff0000')
          node.material.emissiveIntensity = 2
          node.material.metalness = 0.3
          node.material.roughness = 0.4
        }
        if (node.name.toLowerCase() === 'object_34') {
          node.material.color.set('#0b0b0c')
          node.material.metalness = 0.9
          node.material.roughness = 0.2
        }
        if (node.name.toLowerCase() === 'object_38') {
          node.material.emissive = new THREE.Color(0xffffff)
          node.material.emissiveIntensity = 2
        }
        if (['object_7', 'object_39', 'object_40'].includes(node.name.toLowerCase())) {
          node.material.metalness = 0.1
          node.material.roughness = 0
        }
        if (node.name.toLowerCase() === 'object_42') {
          node.material.metalness = 0
          node.material.roughness = 1
        }
        if (node.name.toLowerCase() === 'object_52') {
          node.material.map = null
          node.material.needsUpdate = true
          node.material.color.set('#e5b80b')
        }
      }
    })

    if (materials?.MetalPart) {
      applyProps(materials.MetalPart, { color: 'gray', metalness: 1, roughness: 0.2 })
    }
  }, [nodes, materials])

  return <primitive object={scene} {...props} />
}

export default function SceneModel(props: SceneModelProps) {
  return (
    <Suspense fallback={null}>
      <Model {...props} />
    </Suspense>
  )
}
The <Porsche> component renders the 3D model and supports minor customizations. For example, I styled my version with a black and gold color scheme. To explore the model's structure, nodes, and materials, I used a online 3D viewer to inspect the contents of the .gltf file.
'use-client'

import { useState, useEffect } from 'react'
import { KernelSize, LUTCubeLoader } from 'postprocessing'
import { LUT, EffectComposer, Bloom } from '@react-three/postprocessing'
import { useControls } from 'leva'
import { Texture } from 'three'

export function Effects() {
  const [texture, setTexture] = useState<Texture | null>(null)
  useEffect(() => {
    const loader = new LUTCubeLoader()
    loader.load(
      '/three-js/F-6800-STD.cube',
      (loadedTexture: unknown) => setTexture(loadedTexture as Texture),
      undefined,
      (error: Error) => console.error('Failed to load LUT', error)
    )
  }, [])

  const { intensity, kernelSize, luminanceSmoothing, luminanceThreshold, opacity } = useControls(
    'Bloom Effect',
    {
      intensity: { value: 1.75, min: 0, max: 5, step: 0.1 },
      kernelSize: {
        value: KernelSize.MEDIUM,
        options: {
          Small: KernelSize.SMALL,
          Medium: KernelSize.MEDIUM,
          Large: KernelSize.LARGE,
          VeryLarge: KernelSize.VERY_LARGE,
        },
      },
      luminanceThreshold: { value: 0.2, min: 0, max: 1, step: 0.01 },
      luminanceSmoothing: { value: 0.025, min: 0, max: 1, step: 0.01 },
      opacity: { value: 1, min: 0, max: 1, step: 0.01 },
    },
    { order: 2 }
  )

  if (!texture) return null

  return (
    <EffectComposer enableNormalPass>
      <Bloom
        kernelSize={kernelSize}
        luminanceThreshold={luminanceThreshold}
        mipmapBlur
        luminanceSmoothing={luminanceSmoothing}
        intensity={intensity}
        opacity={opacity}
      />
      <LUT lut={texture} />
    </EffectComposer>
  )
}
EffectComposer is a utility used for post-processing effects. Allowing you to apply multiple visual effects (like bloom, depth of field, or color grading) to your 3D scene after it has been rendered. EffectComposer renders it to a series of off-screen buffers (called passes), giving you full control over how the final image is composed. It’s essential for creating cinematic or stylized visuals in real-time graphics.
Bloom Effect is a popular post-processing effect that creates a soft glow around bright areas of a 3D scene, mimicking the way light bleeds in real-world cameras and human eyes. It enhances highlights and adds a dreamy, atmospheric quality to visuals by blurring and intensifying light sources. In the postprocessing, the Bloom Effect is customizable for intensity, radius, and threshold, helping artists achieve cinematic and visually appealing results.
A LUT (Lookup Table) Effect is a post-processing tool used to apply color grading to a 3D scene by remapping its colors based on a predefined 3D color lookup table. It’s commonly used in photography and film to achieve a specific visual style or mood, such as cinematic tones or vintage looks. In the postprocessing, the LUT3DEffect lets you easily apply these color transformations to your rendered scene, enhancing its overall aesthetic.
'use client'

import { useControls } from 'leva'
import { useFrame, useThree } from '@react-three/fiber'

type CameraRotatorProps = {
  isUserInteracting: boolean
}

export default function CameraRotator(props: CameraRotatorProps) {
  const { camera } = useThree()

  const { rotate } = useControls({ rotate: true }, { order: 1 })

  const { isUserInteracting } = props

  useFrame(() => {
    if (!isUserInteracting && rotate) {
      const distance = Math.sqrt(camera.position.x ** 2 + camera.position.z ** 2)
      const angle = Math.atan2(camera.position.x, camera.position.z)

      const newAngle = angle + 0.001

      const y = camera.position.y
      const x = distance * Math.sin(newAngle)
      const z = distance * Math.cos(newAngle)

      camera.position.set(x, y, z)
      camera.lookAt(0, 0, 0)
    }
  })

  return null
}
I created a <CameraRotator> component to mimic the rotating camera effect often seen in car shows, where the vehicle spins on a platform. This component automatically rotates the camera when the OrbitControls aren’t being used, providing a smooth, continuous view of the model.

Check out Three.js Porsche Playground
Summary
Three.js is a powerful library widely used by creative teams to build some of the most innovative and visually stunning websites today. By exploring the work of these pioneers, you can find inspiration to fuel your own projects. The best way to learn is to discover something that excites you and start recreating it yourself.
